So, you are a Node.js developer trying to deploy your Express and Mongoose REST API on cPanel. Well, you’ve come across the perfect guide that guides you through each step. Whether you’re new to development or are just looking for a smooth process, this guide is set to take you through a smooth process for a hassle-free deployment.
Following this guideline, you’ll master the framework of Node.js, i.e., Express deployment on cPanel, an essential skill for web developers. This step-by-step guide covers each tiny detail and helps you successfully deploy your REST API. So, let’s get started and learn to deploy your Node.js, Express, and Mongoose API with MongoDB!
-
- Ensure your Node.js, Express, and Mongoose application is ready for deployment.
- Check your package.json to see if it contains all dependencies and scripts (e.g., “start”: “node server.js”).
-
- Zip your project folder.
- Don’t include the node_modules directory while zipping your project ( use .gitignore or manually exclude it).

- Create a .env file that stores your environment variables like DB connection strings and API keys.
-
- Log in to your cPanel account.

-
- In cPanel, navigate to the Software section and click Setup Node.js App.

-
- Choose the appropriate Node.js version (same as your app version), the Application Mode (choose “development”), the Application Root (the folder where you’ll upload your app), and the Application URL (public URL through which your app will be accessed)

-
- Click Create to set up the app.
-
-
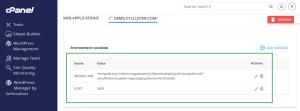
- After creating the Node.js application, you must add any necessary environment variables (MONGO_URI and PORT) inside your Node.js App section.
-
- Alternatively, you can also create a .env file in your project’s root directory and add the required variables.
-
-
- Navigate to File Manager in cPanel, where you’ll see the Application Root folder.
- Inside the Application Root folder, upload your zipped project file.

-
- After uploading, extract the zip file inside the Application Root folder.

-
-
- Open the Terminal in cPanel and move to your project folder ( where you extracted your project)
- Run:
npm install in the Terminal

-
- This will install all the required dependencies mentioned in your package.json.
-
-
- Once all the dependencies are installed, return to the Setup Node.js App section and start the app.
- You can also start the app manually using the Terminal by running.
npm start
-
- Click on the URL to start your app and see your project load.
- In some cases, after installation, problems like this can arise:

-
-
-
- Then, you can add a route in your hostname “/API/tasks.”
- Check the connection of MongoDB ( review the logs and run a test query).
As you navigate the deployment process, you will encounter various challenges. Let’s look at some common issues you might face, alongside tips to address them:
- Missing Dependencies: One of the most common errors faced during deployment. Most missing dependencies-related errors can be fixed by simply running
npm install (This ensures that all the necessary packages are installed)
- Environment Variables: If your app fails to connect with MongoDB, double-check your .env file for the correct variables.
- Permissions: Ensure that the app’s files and directories have the correct permissions to run on the server.
- Logs: If your app crashes or fails to start, check for error logs in your cPanel. By checking the log, you can figure out where the problem lies.
While deploying Node.js, Express, and Mongoose REST API with MongoDB on cPanel might seem challenging, this beginner-friendly guide demonstrates the easiest method for a solid deployment. This guide was made to get your app running and help people understand the key components of deployment. With this guide, you will learn concepts like environment variables, application configuration, and dependency management.
Good luck with your deployment!!


